Have you ever thought about the necessity of an assistant that could answer an interviewer’s question for you? With the current advancements in AI, this has become a reality!
In this article, we will build a small application using Whisper for voice recognition and ChatGPT for text generation. We will also wrap our application in a simple UI that will help you succeed in any job interview.

Disclamer: I strongly advise against using the created application for its direct purpose. The goal of this article is to demonstrate how you can build in one evening a working prototype that was only a dream a year ago.
Overview The Solution

Our application, at the press of a button, will record audio — it is crucial to activate it promptly during a question. Subsequently, we will transcribe speech from the audio using OpenAI’s Whisper model. After this, we will ask ChatGPT to compose a response to the question and display it on the screen. This process will take a bit of time, so you will be able to respond to the interviewer’s question virtually without hesitation.
A few notes before we start:
- I intentionally used ready-made APIs so that the solution would not require many resources and could run even on a low-powered laptop.
- I have tested the application’s functionality only on Linux. It may be necessary to change the audio recording libraries or install additional drivers for other platforms.
- You can find all the code in the GitHub repository.
What are we waiting for? Let’s get started!
Capturing Speaker Audio
Since we aim to develop an application that operates independently of the platform through which you’re conducting your calls — be it Google Meet, Zoom, Skype, etc., we can’t leverage the APIs of these applications. Therefore, we need to capture audio directly on our computer.
It’s crucial to note that we will record the audio stream not via the microphone but the one flowing through the speakers. After a bit of googling, I found a soundcard library. The authors claim it to be cross-platform, so you should encounter no issues with it.
The only drawback for me was the need to explicitly pass the range of time for how long the recording will take. However, this problem is solvable, as the recording function returns the audio data in a numpy array, which can be concatenated.
So, the simple code to record audio streams through speakers would look like this:
import soundcard as sc


RECORD_SEC = 5
SAMPLE_RATE = 48000
with sc.get_microphone(
      id=str(sc.default_speaker().name),
      include_loopback=True,
  ).recorder(samplerate=SAMPLE_RATE) as mic:
      audio_data = mic.record(numframes=SAMPLE_RATE * RECORD_SEC)
Subsequently, we can save it as a .wav file using the soundfile library:
import soundfile as sf


sf.write(file="out.wav", data=audio_data, samplerate=SAMPLE_RATE)
Here you will find the code related to audio recording.
Speech-to-text

This step is relatively simple, as we will be utilizing the API of the pre-trained Whisper model from OpenAI:
import openai


def transcribe_audio(path_to_file: str = "out.wav") -> str:
    with open(path_to_file, "rb") as audio_file:
        transcript = openai.Audio.translate("whisper-1", audio_file)
    return transcript["text"]
During testing, I found the quality to be excellent. Transcribing the audio recordings was also quick, which is why I chose this model. In addition, this model can process languages other than English, allowing you to go through interviews in any language.
If you prefer not to use the API, you can run it locally. I would advise you to use whisper.cpp. It is a high-performance solution that doesn’t consume a lot of resources (the library’s author ran the model on an iPhone 13 device).
Here you will find the Whisper API documentation.
Answer generation
To generate an answer to the interviewer’s question, we will be using ChatGPT. Although using the API seems like a simple task, we will need to solve two additional issues:
- Improve the Quality of the Transcripts — The transcripts may not be always perfect. There might have been issues with the interviewer’s audibility or perhaps the record button was pressed a tad late.
- Speed-up Text Generation — It is crucial for us to receive the answer as quickly as possible to maintain the flow of the conversation and prevent any doubts.
1. Improve the quality of the transcripts
To manage this, we will clearly specify in the system prompt that we are using potentially imperfect audio transcriptions:
SYSTEM_PROMPT = """You are interviewing for a {INTERVIEW_POSTION} position.
You will receive an audio transcription of the question.
Your task is to understand question and write an answer to it."""
2. Speed-up text generation
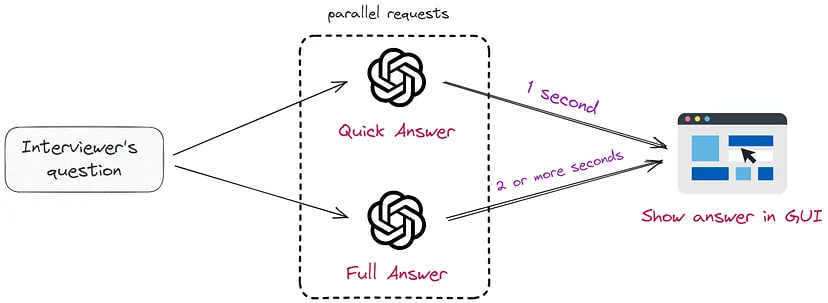
To accelerate the generation, we will make two simultaneous requests to ChatGPT. This concept closely resembles the approach outlined in the Skeleton-of-Thought article and is visually represented below:

The initial request will generate a quick response, consisting of no more than 70 words. This will help continue the interview without any awkward pauses:
QUICK = "Concisely respond, limiting your answer to 70 words."
The second request will return a more detailed answer. This is necessary to support further engagement in the conversation:
FULL = """Before answering, take a deep breath and think step by step.
Your answer should not exceed more than 150 words."""
It’s worth noting that the prompt employs the structure “take a deep breath and think step by step”, a method proven by recent studies to provide superior response quality.
Here you will find the code related to the ChatGPT API.
Making a simple GUI

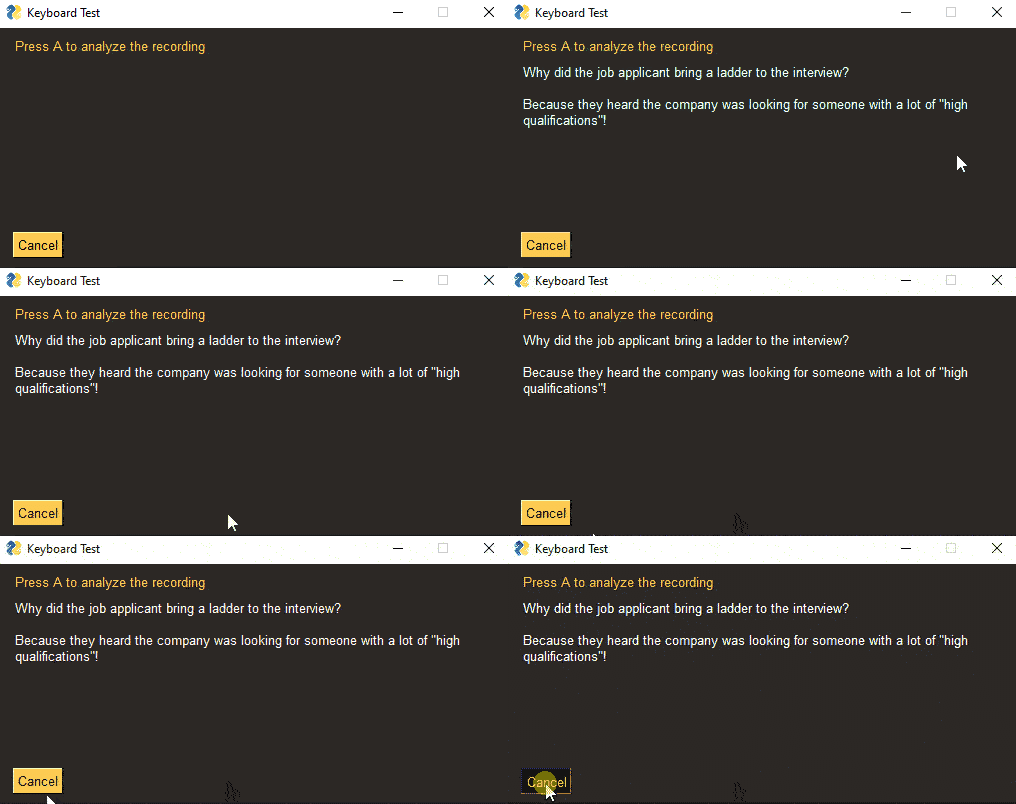
To visualize the response from ChatGPT, we need to create a simple GUI application. After exploring several frameworks, I decided to settle on PySimpleGUI. It allows for the creation GUI applications trivially with a full set of widgets. In addition, I need the following functionality:
• Rapid prototyping.
• Native support for executing long functions in a separate thread.
• Keyboard button control.
Below is an example of code for creating a simple application that sends requests to OpenAI API in a separate thread using perfrom_long_peration:
import PySimpleGUI as sg


sg.theme("DarkAmber")
chat_gpt_answer = sg.Text(  # we will update text later
    "",
    size=(60, 10),
    background_color=sg.theme_background_color(),
    text_color="white",
)
layout = [
    [sg.Text("Press A to analyze the recording")],
    [chat_gpt_answer],
    [sg.Button("Cancel")],
]
WINDOW = sg.Window("Keyboard Test", layout, return_keyboard_events=True, use_default_focus=False)

while True:
    event, values = WINDOW.read()
    if event in ["Cancel", sg.WIN_CLOSED]:
        break
    elif event in ("a", "A"):  # Press A --> analyze
        chat_gpt_answer.update("Making a call to ChatGPT..")
        WINDOW.perform_long_operation(
            lambda: generate_answer("Tell me a joke about interviewing"),
            "-CHAT_GPT ANSWER-",
        )
    elif event == "-CHAT_GPT ANSWER-":
        chat_gpt_answer.update(values["-CHAT_GPT ANSWER-"])
Here you will find the code related to the GUI application.
Put it all together
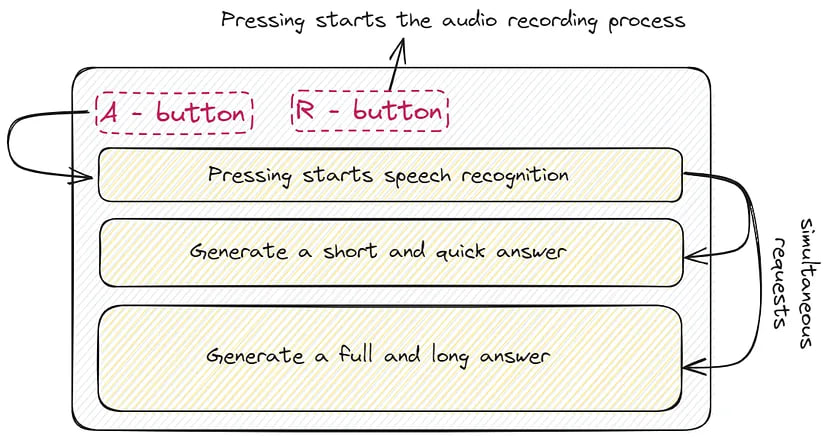
Now that we have explored all the necessary components, it’s time to assemble our application. We’ve delved into acquiring audio, translating it into text using Whisper, and generating responses with ChatGPT. We also discussed creating a simple GUI:

Let’s now take a look at a demonstration video to see how all these components work together. This will provide a clearer understanding of how you can utilize or modify this application for your needs.
Here is a demonstration:
Further work
If you wish to advance and enhance this solution, here are a few ways for improvement:
• Accelerate Responses from LLM: To do this, you can utilize open-source models with fewer parameters, such as LlaMA-2 13B, to quicken the response time.
• Use NVIDIA Broadcast: This model adds eye contact, ensuring that you always appear to be looking at the camera. In this case, the interviewer will not notice you reading the answer.

• Create a Browser Extension: This could be particularly useful if you’re asked to perform live coding during an interview. In such cases, you would simply highlight the question/task.
Conclusion
We’ve been on an interesting journey to see how artificial intelligence, specifically Whisper and ChatGPT, can become a handy assistant during job interviews. This application is a peek into the future, showing us how seamlessly technology can fit into our everyday tasks, making our lives a little easier. However, the purpose of this app is to explore and understand the possibilities of Generative AI, and it is important to use such technology ethically and responsibly.
In wrapping up, the possibilities with AI are truly endless and exciting. This prototype is just a stepping stone and there is much more to explore. For those looking to delve deeper into the world, the road is open and who knows what incredible innovations are waiting around the corner.